Monday, 25 April 2011

Ways to Save Printer Ink

type="html">

When you purchase a printer for your computer, the price you pay for the device itself is only a fraction of the cost you incur over the life of the device. From time to time, you must replace your printer's ink cartridges. Lessen your ink consumption by developing wise printing habits.

Print Quality
Most printers have the option of printing documents and pictures at various quality levels -- and the lower the print quality, the less ink the printer uses. Except for "final draft" items you need to turn in to a supervisor or instructor at work or school, get into the habit of printing documents at low quality to save on ink.

Page Count
When you print a document, your computer will prompt you to enter the pages of the document you want to print. Look through your document before printing to verify that you need all its pages -- and if you don't, adjust the page range to reflect what you do need. If you print a receipt from a website, for example, the entire document may take up four pages, even though your receipt itself appears entirely within the second page.
Color vs. Black and White
On the whole, color cartridges are more expensive than black and white ones -- and, since color documents print using a combination of ink hues -- these cartridges run out faster with regular use. Even if a document appears in color on your screen, your computer gives you the option to print it in black and white. Unless printing in color is essential to the purpose for which you use your document.

Mobile Documents
With the advent of "smartphone" devices such as the Android, BlackBerry and iPhone, the necessity to print out certain documents at all has lessened. From receipts to emails to -- in some instances -- airline boarding passes, it's possible to pull up full-length documents using the email or Internet feature on your handheld device. This saves not only on ink, but also on paper.

Enable ATI Theater Mode

type="html">

ATI Theater Mode is especially useful if your personal computer contains video files that cannot be played on your DVD player. For example, you may have home movies on your personal computer and no way to watch them on your TV. Theater mode is an effective way to send videos to your TV with minimal hassle.

1). Right-click the desktop. A context menu will appear.

2). Select "Catalyst Control Center" from the context menu. Catalyst Control Center will load.

3). Select the "Graphics Settings" tab.
4). Click "Avivo Video" in the left-hand column. A sub-menu will then expand.

5). Click "Theater Mode" in the sub-menu. This will cause "Theater Mode" to be displayed in the main menu.

6). Select "in Theater Mode (full screen)" in the "Select Theater Mode Overlay" setting.

7). Select "Match the source video" in the "Theater Mode Settings" section.

8). Play your video, which will now be displayed on your television.

Diagnose a Graphics Card Problem

type="html">

Blank screens, display monitor flickering, squealing noises, incorrect text and monitor display sizes are all signs that require your graphics card settings to be adjusted. Thankfully, you can resolve many of these issues without having to dismantle your computer. By checking the connections and altering the refresh rate and resolution settings, your graphics card diagnosis will lead you to a fast and clearer visual repair.

1). Check the connections from the graphics card and video cable and verify that each one is securely attached if a blank or black screen is displayed. If your computer monitor does not work correctly, go to the next step.

2). Replace cables that have bent or damaged pins in the connector. If your computer monitor does not work correctly, go to the next step.

3). Change your display resolution if the text or monitor display size is incorrect. Click the "Start" button, click the "Control Panel" and then click "Adjust screen resolution" under "Appearance and Personalization."

4). Click the "Resolution" drop-down list and then move the slider to the "Recommended" resolution size for your monitor. Click "Apply." If your computer monitor does not work correctly, go to the next step.
5). Change your refresh rate if the display flickers. Click the "Start" button, click "Control Panel," and then click "Appearance and Personalization."

6). Click "Personalization," click "Display Settings," and then click "Advanced Settings."

7). Click the "Monitor" tab and then check the "Hide modes that this monitor cannot display" if it is not already checked.

8). Click the pull-down list under "Screen refresh rate" and select a new refresh rate. Click "Apply" within 15 seconds after your display illustrates the new changes otherwise the changes will not take affect. If your computer monitor does not work correctly, go to the next step.

9). Visit the graphics card manufacturer's website and update the driver for the graphics card.

Problems Installing GeForce 8400

type="html">


GeForce 8400 is a high-performance video card used for video games and multi-media applications. It features 512MB of video memory, full DirectX 10 support, SLI technology and dual DVI outputs. The GeForce 8400 is also compatible with Windows, Macintosh and Linux operating systems. However, when installing the GeForce 8400, like any video card, problems can occur with compatibility and other factors.

Motherboard Incompatibility
Video cards come with a few different slot types. This includes PCI, AGP and PCI-Express. The GeForce 8400 uses PCI-Express technology specifically. If your motherboard is outdated, or does not contain a PCI-Express slot, the GeForce 8400 will not work. So before purchasing a video card it is important to refer to your motherboard specifications to check for compatibility.

Output Problems
The GeForce 8400 features dual DVI outputs for monitor and TV connections. In order for a proper connection your TV or monitor it should also have a DVI input. However, if your monitor or TV does not have a DVI output, adapters can solve this problem. In most cases, the adapters you would need to solve this problem are either DVI to VGA or DVI to HDMI.

Outdated or Incorrect Drivers
Up-to-date drivers are necessary for the GeForce 8400 to run properly. If your drivers are out of date, or designated for an incorrect operating system the card will not function properly. In order to download the latest drivers for your operating system you will want to visit Nvidia's website. When downloading the drivers you will need to input your operating system and video card model.

Resolution Problems
Once the drivers are up-to-date, video settings may need to be adjusted. This includes resolution, aspect ratios and more. To adjust your settings accordingly, right click anywhere on your desktop and select "Personalize". Next, select "Display settings." Now make sure that your GeForce 8400 appears in your display settings. Finally, you can adjust your resolution and aspect ratio using the sliders on the display settings window.

VESA Specifications

type="html">


VESA, short for Video Electronics Standards Association, is an international organization founded in 1989 that established industry wide standards for uniformity in the video electronics market. VESA wall mounts have become especially important for mounting flat-panel plasma televisions and LCD monitors. The standards provide equipment manufacturers with specific guidelines of mounting-hole pattern placement and screw size in three different designs which are based on the monitor's weight and size of the screen.


VESA MIS-D
The VESA MIS-D is the standard design for small- and medium-sized flat panels, LCD monitors and screens. The design accommodates screens that range in size from 12 to 22.9 inches diagonally with a maximum weight of 30.8 pounds. The four-hole screw pattern ranges in size from 2.95-by-2.95 inches to 3.94-by-3.94 inches.

VESA MIS-E
The VESA MIS-E standard design is for larger LCD monitors, flat panels and screens with a maximum weight of up to 50 pounds. It can accommodate screen sizes between 23 and 30.9 inches diagonally and includes two six-hole screw patterns: 7.87-by-3.94 inches, and 7.87-by-7.87 inches.

VESA MIS-F
The VESA MIS-F standard design is for large LCD television monitors and plasma screens. Designed for displays that range from 31 to 90 inches diagonally, it can accommodate weights of up to 250 pounds. It includes three different hole patterns: 15.7-by-7.87 inches, 23.57-by-15.7 inches, and 31.4-by-15.7 inches.

What Is a VESA Wall Mount?

type="html">


VESA, the Video Electronics Standard Association, is an international body that sets standards for computer graphics. VESA standards also relate to display devices, and the safe and proper attachment, or mounting, of such devices.

Definition
A VESA wall mount, also referred to as FDMI, or Flat Display Mounting Interface, is a device that screws or otherwise attaches to a wall and supports display devices such as plasma televisions and other flat-panel monitors. Manufacturers that produce VESA wall mounts must meet certain variant standards to be VESA compliant.

Variants
The MIS-D, or original VESAmount, includes a panel that must contain four screws in a square arrangement. These screws require a vertical and horizontal distance between them of 100 mm. MIS-D screws use an M4 thread, or ridge that wraps around the screw to form a helix shape. M4 refers to a 4-mm diameter screw head. MIS-D screw holes are 10 mm deep; 10 mm fasteners are typically included with the VESA mount. Another VESA mount variant is the MIS-D 75, which has a 75-mm layout.

Identification
Manufacturers of VESA-compliant devices can display a label verifying that they meet the appropriate standards, called the "VESA mounting compliant" logo.

Monitors That are Compatible With Vesa Bracket Mounts

type="html">


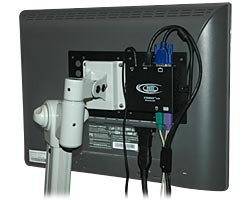
A Vesa monitor mount is an option for hanging a monitor on a wall or on a swivel arm. These bracket mounts are configured with two standard hole patterns. On them, you will find a set of four screw holes with a horizontal and vertical measurement of 75 millimeters, or about 3 inches apart. A second set of holes for four screws measures 100 millimeters or about 4 inches apart.

HP LP2065 20-inch LCD Monitor
Hewlett-Packard's LP2065 20-inch LCD monitor has a removable stand and 100 millimeter holes for mounting. The video input supports digital signal inputs and DVI analog. This monitor includes two DVI-I to VGA and two DVI-Digital cables. It has a 2.0 USB hub that has one output to connect to the computer and four inputs for USB device connection. The viewing angle is 178/178 degrees. The video inputs are digital DVI-I, S-Video, analog RGB and composite video.

NEC MultiSync E222W 22-inch Wide-screen LCD Monitor
This monitor has ergonomic features making it flexible for daily use. The NEC MultiSync has Vesa mounts and a hand grip on the rear. This monitor features a 22-inch LCD display measuring 20 inches by 8.4 inches by 15.2 inches. It weighs 15 pounds. It also has a swivel that may be adjusted for tilt and height. It has an image aspect ratio of 16:10. The image brightness is 300 cd/m2 and an image contrast ratio of 1,000:1. The signal output is VGA and DVI-D and the monitor is certified for use with Windows Vista.

EIZO ColorEdge CG223W-BK 22-inch Wide-screen LCD Monitor
The Eizo ColorEdge has a FlexStand that will allow you to swivel, tilt and rotate the monitor by 90 degrees to provide a portrait view. You also can mount the monitor onto a Vesa bracket. This monitor features a USB hub. Its dimensions are 20.1 inches by 10.1 inches by 20.6 inches. It weighs 21.2 pounds. Its aspect ratio is 16:10 and it has an image contrast ratio of 950:1. The signal input is DVI-I, and it comes with Display-Port.